
GETTING STARTED
Set up Axis Engage
Axis Engage brings all your customer conversations into one place. Instead of bouncing between WhatsApp, Instagram, Facebook Messenger, SMS, and email, you handle everything from a single inbox.
This guide takes you from signup through your first conversation. Most teams finish it in 15 minutes.
Step 1: How to Create an Axis Engage Account
What you need to know
Your account is your company's workspace in Axis Engage. Everything lives inside it: your channels, conversations, contacts, and team.
Before you begin
Have your business email address ready. You don't need a credit card.
Create your account
- 1
Go to the Axis Engage registration page
- 2
Fill in the required information to create your account
- 3
Accept the Privacy Policy and Terms of Use, then click Get Started Now
What happens next
You land inside Axis Engage. Your workspace is empty until you connect a channel, so that's where you'll go next.
Frequently asked questions
Can multiple people use the same workspace?
Yes. You invite teammates in Step 4. Each person logs in with their own email.
Do I need a phone number to sign up?
Not for signup. You'll need one when you connect WhatsApp or SMS.
We already use another Axis app. Do we need a new account?
No. Your profile menu at the bottom left switches between Axis apps.
Step 2: Set Up Your Business Information
About your business information
This is where you tell Axis about your business: your company name, your logo, and how you want to appear to customers.
Why add your business information
Customers see this. When someone messages you, your business name is what shows up. Spending two minutes here is the difference between looking established and looking like a stranger.
How to do it
Go to Account to view and edit your account profile. Click Edit to make changes.
What to expect
None of this is final. You can come back and change any of it later.
Step 3: How to Connect Your First Communication Channel
About communication channels
A channel is a place where customers can reach you. You need at least one before Axis Engage does anything useful.
Axis Engage supports eight:
| Channel | What it is |
|---|---|
| WhatsApp QR | Links your existing WhatsApp account by scanning a code, the way WhatsApp Web works |
| WhatsApp Business API | Meta's official business messaging product, built for automation and volume |
| Facebook Messenger | Messages sent to your Facebook Page |
| Instagram direct messages | |
| Live Chat | A chat widget on your website |
| SMS | Text messages sent from a shortcode |
| Email from an address you own | |
| Google Business | Messages from your Google Business profile |
Before you begin
You need administrator access to whatever you're connecting: your Facebook Page, your Instagram account, your Google Business profile.
Choose the right Whatsapp account
This is the one decision worth slowing down for. WhatsApp QR and WhatsApp Business API sound similar and behave very differently. Choosing wrong means redoing the setup later.
| WhatsApp QR | WhatsApp Business API | |
|---|---|---|
| How you connect | Scan a code yourself, in minutes | Submit a request, our team sets it up |
| Phone number | Any WhatsApp number you already use | A number already registered for the API in an approved whatsapp business account in Meta Business Manager |
| Setup fee | None | One-time fee |
| Daily limit | 200 messages per day | No 200-message cap |
| Message templates | Not needed | Required, and must be approved before you can send |
| Best for | Small teams, testing, low volume | Regular campaigns, notifications, order updates, OTPs |
Know which channels you can connect yourself
Five channels are instant. Three need our team to provision something first, which matters if you're planning a launch date.
Where to find this
All channels are set up in the same place: Settings → Channels.
Connect WhatsApp QR
Have your phone in hand. You'll scan a code with it.
- 1
From Channels, select WhatsApp QR
- 2
Enter your Business name
- 3
Enter your WhatsApp business number
- 4
Click Generate QR code
- 5
On your phone, open WhatsApp, tap Settings (iPhone) or the three-dot menu (Android), select Linked Devices, then tap Link a Device
- 6
Scan the code shown on your screen
- 7
Back in Axis Engage, click I Have Scanned the QR Code
.png&w=3840&q=75)
.png&w=3840&q=75)
Important things to know:
Campaigns over WhatsApp QR are capped at 200 messages a day. If your audience is bigger, use Batch Send and Axis will spread the campaign across several days for you. Keep the linked phone online. The connection depends on it, same as WhatsApp Web.
Connect Facebook Messenger and Instagram together
If your Instagram is linked to a Facebook Page, this flow connects both at once.
- 1
Select Messenger from the Channels page
- 2
Click Connect
- 3
Log in to Facebook if prompted
- 4
Choose the Facebook Pages you want Axis Engage to access, then click Continue
- 5
Select the Facebook Business account, then click Continue
- 6
Choose your Instagram accounts if you have them, then click Continue
- 7
Review the permissions
- 8
Click Save
- 9
Click Got It
.png&w=3840&q=75)
Connect Instagram on its own
Use this only if your Instagram account isn't linked to a Facebook Page. If it is, use the Messenger flow above instead.
- 1
Select Instagram
- 2
Sign in to your Instagram account
- 3
Review the permissions
- 4
Click Allow
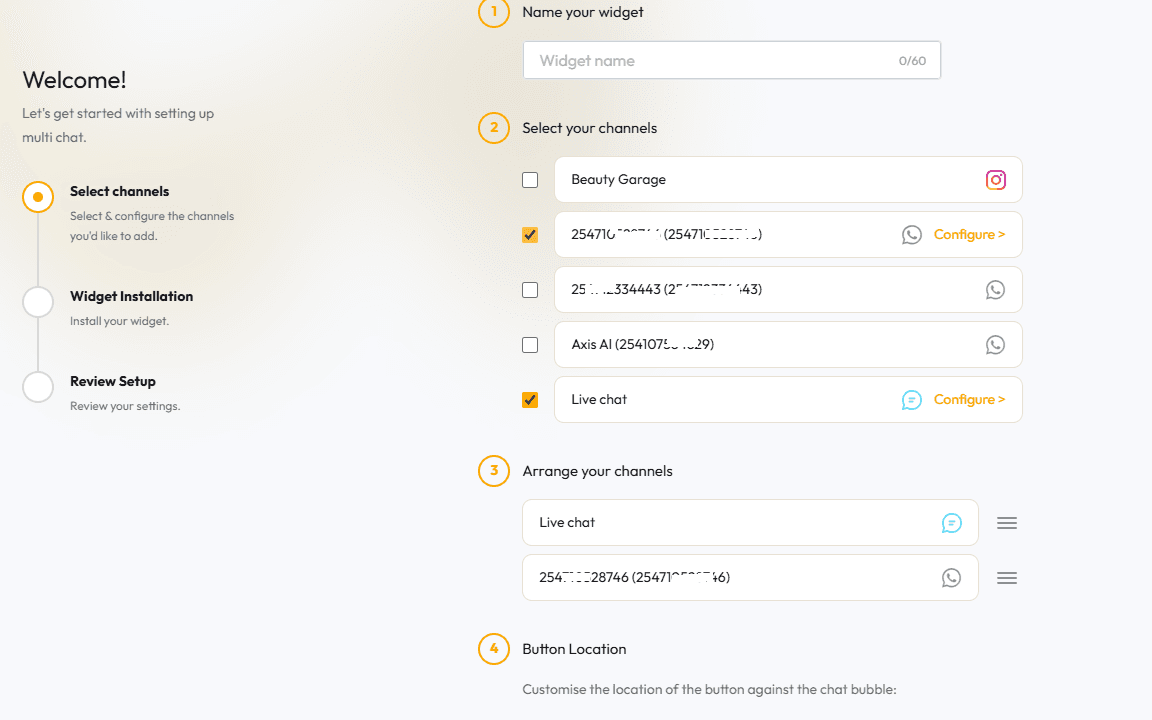
Set up Live Chat on your website
Before you begin: you'll need someone who can add code to your website. If you want the widget to answer questions on its own, train an AI agent first (Step 7).
- 1
Select Live Chat
- 2
Enter a Widget Name
- 3
Select the channels you want shown in the widget
- 4
Arrange the order they appear in
- 5
Choose where the button sits on desktop and on mobile
- 6
Click Next
- 7
Copy the installation code and add it to your website
- 8
Enter your website URL and verify the installation
- 9
Review your configuration and finish
Widget configuration page with name, channel selection, and button placement
.png&w=3840&q=75)
Request SMS setup
SMS needs a shortcode, and shortcodes have to be provisioned with mobile networks. Our team handles that.
- 1
Select SMS
- 2
Enter your preferred shortcode
- 3
Submit your request
Request WhatsApp Business API
Before you begin: your number must already be registered for the WhatsApp Business API. If it isn't, sort that out first.
- 1
Select WhatsApp API
- 2
Enter your WhatsApp Business display name
- 3
Enter the registered phone number
- 4
Submit your request
Our team completes onboarding and lets you know when it's done. A one-time setup fee applies.
Once you're connected, you'll need approved message templates before you can run campaigns.
Set up Email
- 1
Select Email
- 2
Enter the address you want to send from
- 3
Enter the sender name customers will see
- 4
Submit the request
Our team finishes the configuration.
Connect Google Business
This covers messages from the panel that appears when someone finds you on Google Search or Maps.
- 1
Select Google Business
- 2
You'll be redirected to the Social Media Connector
- 3
Review the Privacy Policy and Terms of Service
- 4
Click Continue
- 5
Sign in to your Google account
- 6
Grant the permissions Axis Engage needs
- 7
Click Continue
Step 4: How to Invite Team Members to Axis Engage: Step-by-Step Guide
About team invitations
Working alone? Skip this. Got teammates? Invite them now so conversations get shared out instead of piling up on one person.
Why invite your team
Axis Engage assigns new conversations automatically using round robin, which spreads work evenly across whoever is online. That only works once your team is actually in the system.
Axis Engage assigns new conversations automatically using round robin, which spreads work evenly across whoever is online. That only works once your team is actually in the system.
Before you begin
Have your teammates' email addresses ready.
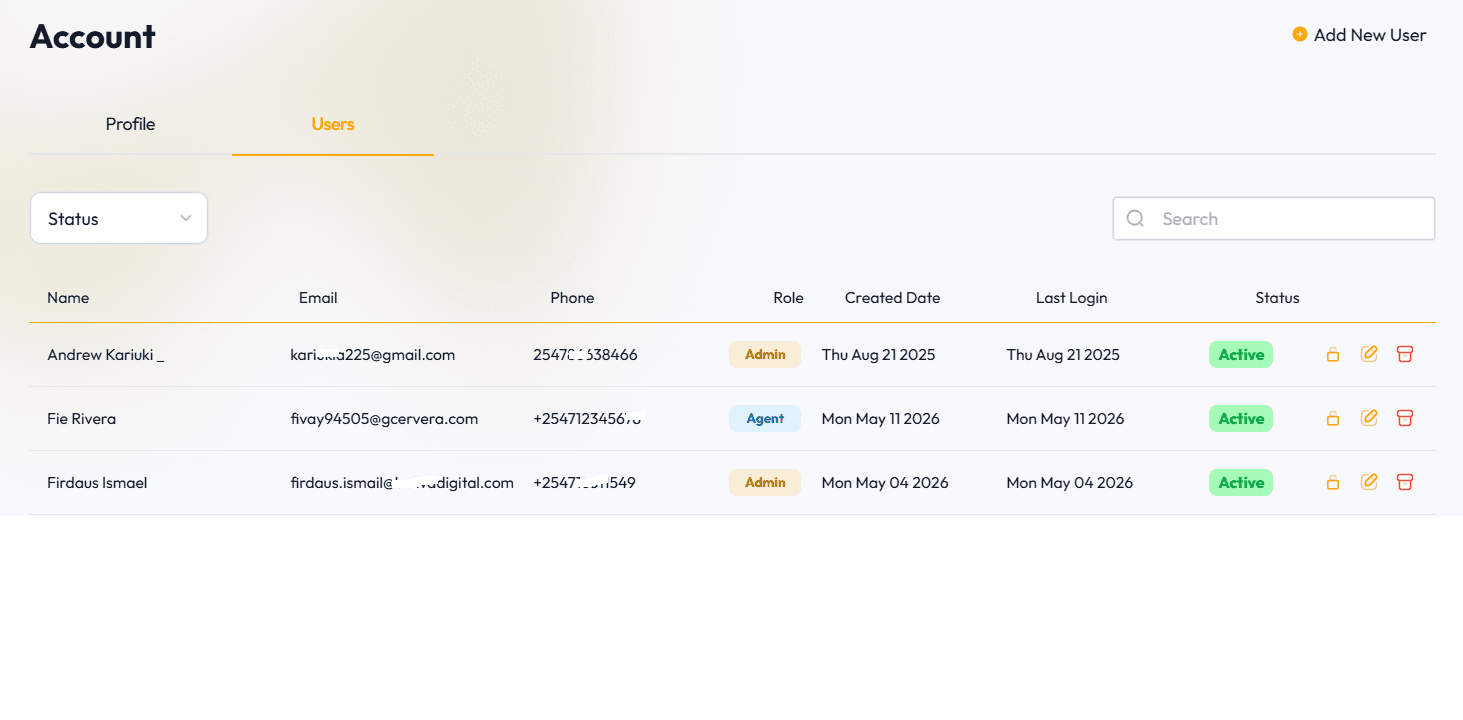
Invite team members
Go to Account → Users to see who has access and manage it.
.png&w=3840&q=75)
The two roles
| Agent | Administrator | |
|---|---|---|
| Respond to customers | yes | no |
| See who a conversation is assigned to | no | yes |
| Reassign conversations | no | yes |
| Bulk assign conversations | no | yes |
| Change workspace settings | no | yes |
Ask your team to set their status to online
Round robin only sends conversations to agents who are marked Online. Your team sets this from the profile menu at the bottom left.
This is the single most common reason a new team wonders why nothing is reaching them.
Step 5: How to Handle Your First Customer Conversation
About conversations
The Inbox is where your team actually works. Every message from every connected channel arrives here.
Handle a customer conversation
The reply goes back on whatever channel the customer used. WhatsApp goes to WhatsApp, Instagram goes to Instagram.
- 1
Send yourself a test message from another phone or account, or wait for a real one
- 2
Click the conversation to open it
- 3
Type your reply and send
The reply goes back on whatever channel the customer used. WhatsApp goes to WhatsApp, Instagram goes to Instagram.
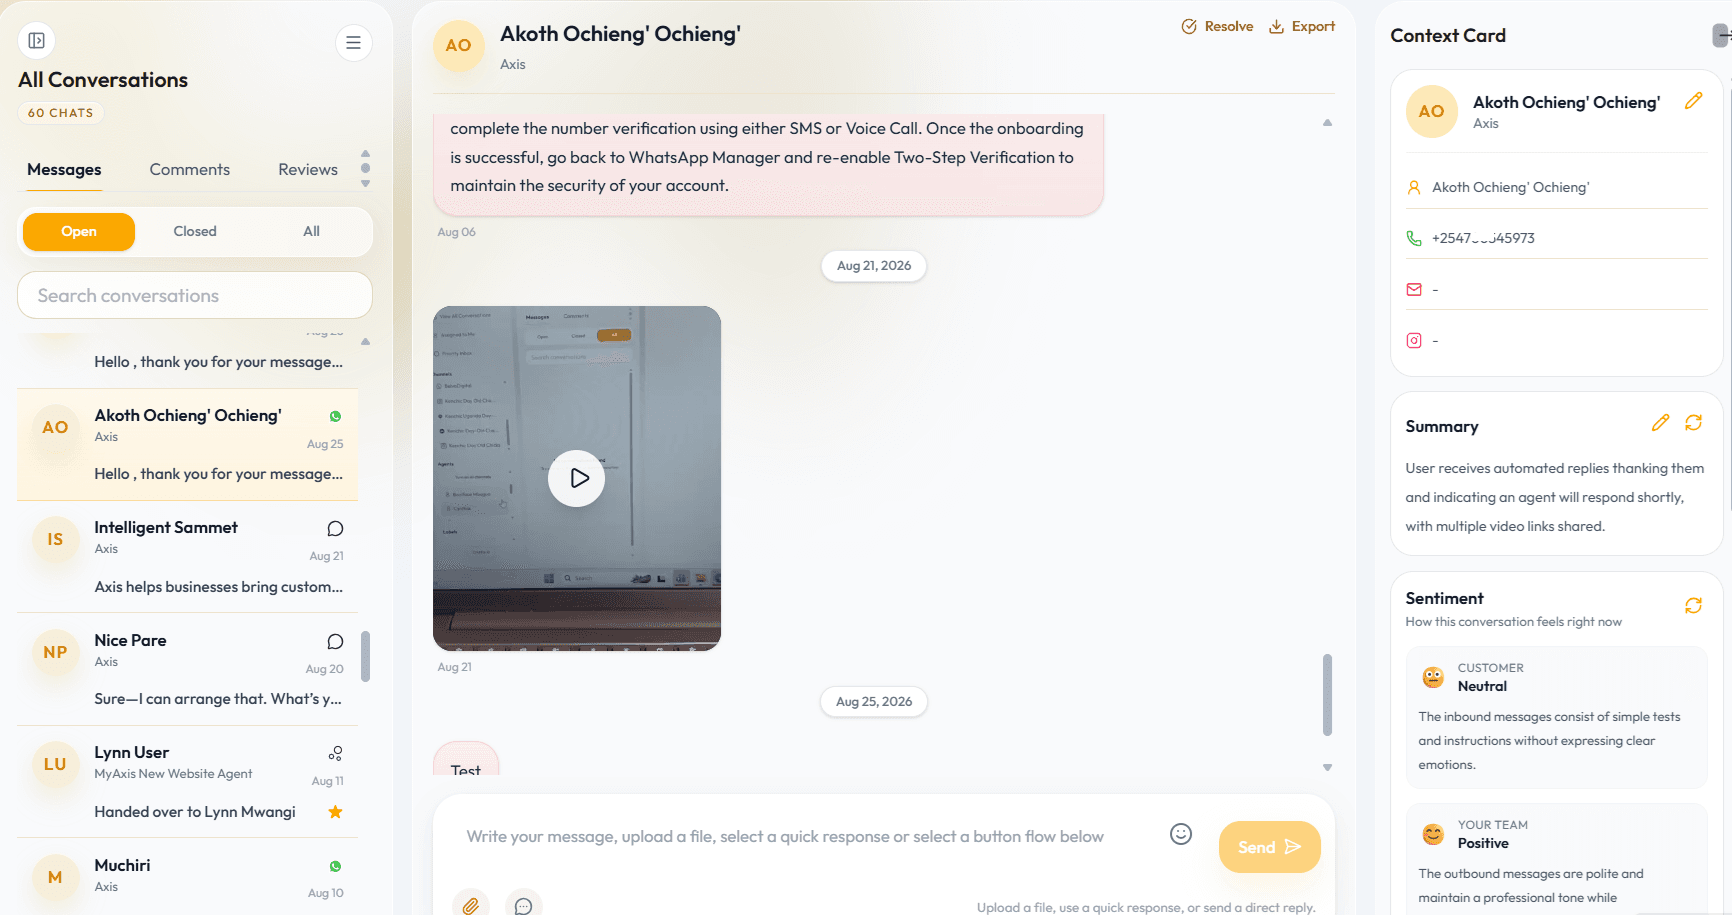
Actions you can take while replying
- 1
Attach files, documents, and screenshots
- 2
Insert emojis
- 3
Use Quick Responses, which are saved replies for questions you answer constantly
Use the Context Card
The panel on the right is the Context Card, and it's the thing that makes Axis Engage faster than juggling apps. It gives an agent everything they need without leaving the conversation.
Customer details
Name, phone number, email, Instagram handle. Conversations that start on your website may arrive thin on detail. As customers share more, you can update the card.
AI Conversation Summary
A short overview of what the customer wants, what's been done, and where things stand. Read this before replying and you skip scrolling the whole thread. You can edit it, or hit Reload to regenerate it.
AI Sentiment Analysis.
Tells you whether the customer sounds Positive, Neutral, or Negative, and does the same for your agent's replies. Hit Reload after new messages. Use it to catch a conversation going sideways before it escalates.
Mark as Priority.
Flags a conversation as Important and moves it into the Priority Inbox. Use it for escalations, high-value customers, and anything time-sensitive.
Actions.
Shows who's handling the conversation. Administrators can reassign from here.
Labels.
Categorise the conversation. More on these below.
Notes.
Internal comments only your team can see. Customers never see them. Use them for follow-ups and context for whoever picks this up next.
Tickets
Each ticket has a unique ID, so you can track separate issues raised inside the same conversation.
Assign a conversation to a team member
Administrators can assign conversations one at a time or in bulk, and reassign from the Actions section of the Context Card.
Close a conversation
Resolve it and it moves to Closed Conversations automatically. You can also export a conversation if you need a record.
Inbox Replies and Meta 24-Hour Window
Inbox replies must be sent within Meta’s 24-hour messaging window.
Agents should prioritize conversations that are approaching the 24-hour deadline to ensure a response is sent in time.
If a conversation has already passed the 24-hour window, sending a reply will not be delivered.
Step 6: How to Find and Organize Conversations in Axis Engage
About conversations management
Once you're past a handful of conversations a day, you need ways to sort and search.
The two views
All Conversations shows everything across every channel. Priority Inbox shows what needs attention now, based on your routing rules and anything marked as Important.
Filters
Filter by conversation type (Messages, Comments and Reviews) and by status (Open, Closed, or All).
.png&w=3840&q=75)
Search
Use the search bar to find a conversation by customer name or by conversation detail.
Labels
Labels categorise conversations so you can filter and report on them. Your administrator creates them in Settings → Unified Inbox to match how your business works. Common ones:
Sales, Support, Billing, Follow-up, Escalated
Step 7: How to Set Up Automation in Axis Engage: Step-by-Step Guide
Why use automation?
Handle conversations manually for a few days first. You'll learn which questions actually repeat, and that tells you exactly what to automate. Teams that automate on day one usually automate the wrong things.
Start with simple automations
Go to Settings → Unified Inbox:
Welcome Message
greet customers automatically when they start a conversation. Set one today. It's the fastest way to look responsive before your team is fully up and running.
Auto Responses
fire when specific conditions or events occur, so customers get information without waiting for an agent.
Quick Responses
are saved replies your agents send with one click.
Build your first AI agent
An AI agent answers customer questions on its own, trained on your own content. It handles the repetitive stuff so your team only picks up what needs a person.
Before you begin
gather what the AI should learn from: your website URL, plus documents like FAQs, guides, policies, and price lists. The agent is only as good as what you feed it. Outdated documents produce outdated answers.
To create one:
- 1
Go to Axis AI in the main navigation
- 2
Select AI Hub
- 3
Click New AI Agent
- 4
Enter a unique AI Agent Name
- 5
Add one or more Website URLs
- 6
Upload your documents by dragging them in or clicking Browse
- 7
Click Create AI Agent
Training starts right away. You'll get a notification when it's ready.
When you click on New AI Agent
.png&w=3840&q=75)
.png&w=3840&q=75)
Understand how conversation handover works
When the AI can't finish the job, it passes the conversation to a human with the context intact. The customer never repeats themselves.
The AI hands over when the customer asks for a person, when it can't answer confidently, when account verification is needed, when the customer gets frustrated, or when an escalation rule fires.
The agent who picks it up receives:
| Information | What it covers |
|---|---|
| Customer profile | Name, contact information, and channel |
| Chat history | The full conversation with the AI |
| AI summary | A short overview |
| Sentiment | The customer's current mood |
| Time of transfer | The exact handover timestamp |
Administrators turn AI routing on and off from the Agents section of the Inbox.
Step 8: How to Send Your First Campaign in Axis Engage
About campaigns
A campaign is an outbound message to many customers at once. A sale, a shipping update, an appointment reminder.
You can send campaigns over WhatsApp Business API, WhatsApp QR, SMS, and Email.
Before you begin
Three things need to be in place:
- 1
The channel is configured in Settings
- 2
You've created a segment, which is a reusable group of contacts
- 3
For WhatsApp API campaigns, you have an approved template
Build your contact list
Go to Audience Centre to add contacts one at a time, import them by CSV, or export what you have. Then group them into Segments with names that mean something: Nairobi Customers, New Leads, VIP Customers.
You target a segment when you send, so this has to exist first.
Send your campaign
- 1
Go to Campaigns and pick your channel
- 2
Click New Campaign
- 3
Name it, then select your target segment
- 4
Choose your message content, whether that's a template, a flow, or a message you write
- 5
Check the live preview on the right
- 6
Choose Send Immediately or Schedule for Later
- 7
Click Launch Campaign
.png&w=3840&q=75)
Campaign Scheduling before launch.
.png&w=3840&q=75)
Whatsapp message templates
WhatsApp Business API campaigns can only use templates Meta has approved. You create them inside Axis Engage and submit them for review.
Templates fall into three categories: Utility for order confirmations and reminders, Marketing for promotions and launches, and Authentication for OTPs and verification codes.
Pick the right category. It affects how quickly your template gets approved.
Understanding your messaging limits
WhatsApp QR campaigns cap at 200 messages a day. Use Batch Send for anything larger.
What's next
You're up and running. Here's what most teams do over the following weeks:
Build a chatbot flow. Campaigns → Bot Builder → WhatsApp Flow opens a drag-and-drop builder for automated journeys like appointment booking or lead qualification. You'll need a WhatsApp template first. Always use Test Chat before publishing.
Check your Leads.
When the AI agent spots that a website visitor wants to be contacted, it asks for their details and captures them. They collect in Leads, where you can search, filter, and export.
Review your reports.
Reports covers overall activity, Inbox performance, agent performance, AI activity, and campaigns. Pick a date range and export.
Keep an eye on Billing.
Your credit balance, current plan, next billing date, and history all live in Billing, along with SMS and WhatsApp API setup fees.
Contact Support
In-app: look for the help option in settings Email: support@myaxis.ai